Spider Mites on Cannabis: Early Detection Before the Damage
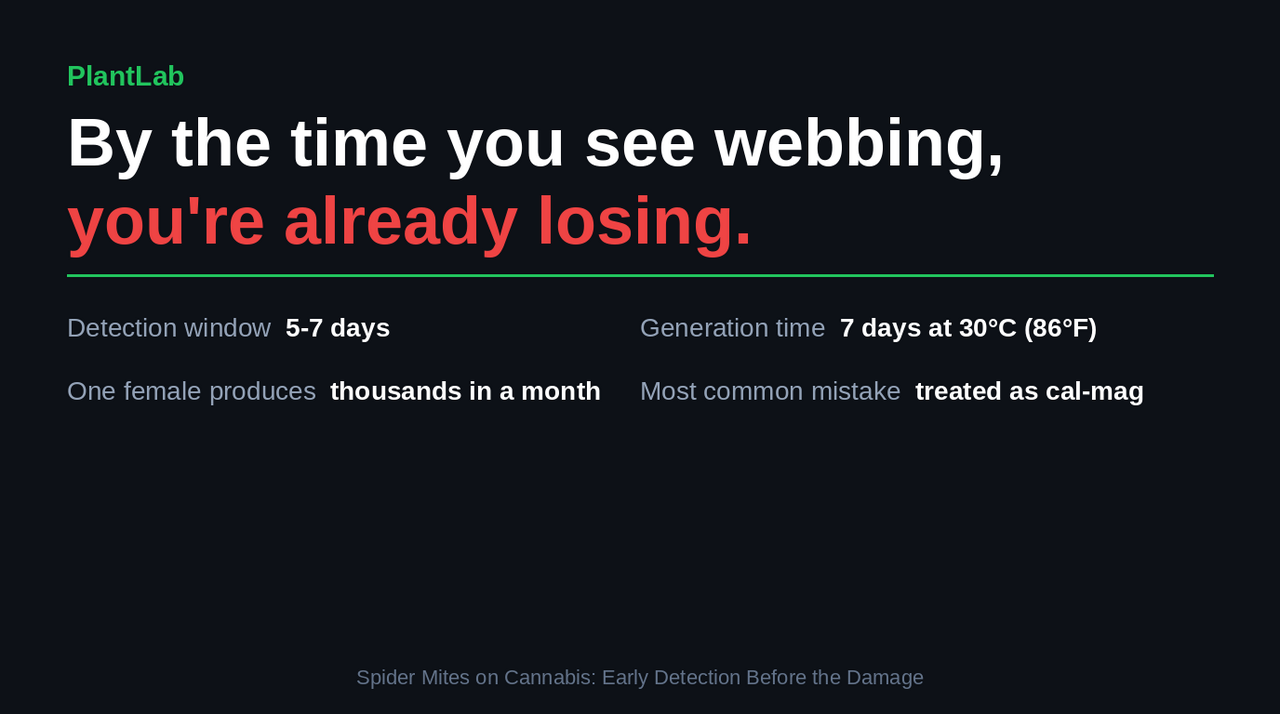
You adjusted your cal-mag for two weeks. The yellowing got worse. Then you saw the webbing.
That’s how most growers discover spider mites - not when the problem starts, but when it’s already out of control. The early damage looks so much like a nutrient deficiency that your first instinct is to adjust the feed. Meanwhile, a single female mite is producing thousands of descendants in a month.
Spider mites are the most destructive pest in indoor cannabis cultivation. Not because they’re hard to kill - they aren’t, when caught early - but because their early symptoms mimic nutrient problems so convincingly that growers lose their detection window treating the wrong thing entirely.
This guide covers visual identification at every stage, how to tell mite damage from a deficiency, and what actually works for treatment.
Quick Identification
Spider mites on cannabis produce tiny yellow or white speckles (stippling) on upper leaf surfaces where mites feed from below. Unlike nutrient deficiencies - which cause broad, uniform color changes across leaves - stippling appears as distinct pinprick dots scattered irregularly across the leaf. The damage is caused by Tetranychus urticae (two-spotted spider mite), an arachnid that punctures individual plant cells and drains their contents. By the time webbing is visible, the colony has been feeding for weeks.
Quick checklist:
- Tiny yellow/white pinprick dots on upper leaf surface
- Dots are irregular and scattered, not following veins
- Leaf undersides show tiny moving specks (mites are 0.3-0.5mm)
- Fine webbing between leaf tips or at branch junctions (advanced)
- Damage starts on lower/inner canopy where airflow is poorest
- Leaves eventually bronze, curl, and drop
Why Spider Mites Are So Hard to Catch
They look like a nutrient deficiency
The single most common spider mite mistake has nothing to do with treatment. It happens at identification.
Early stippling - those tiny yellow dots where mites have punctured cells - looks like the beginning of a calcium deficiency or light stress. The dots are small, scattered, and appear on older growth first. A grower sees yellowing dots on lower leaves and reaches for the cal-mag bottle. Two weeks of feed adjustments later, the dots have spread, the plant looks worse, and then the webbing appears.
This is not a knowledge failure. It’s a pattern recognition problem. The visual difference between early mite stippling and early nutrient deficiency is subtle enough that experienced growers miss it regularly.
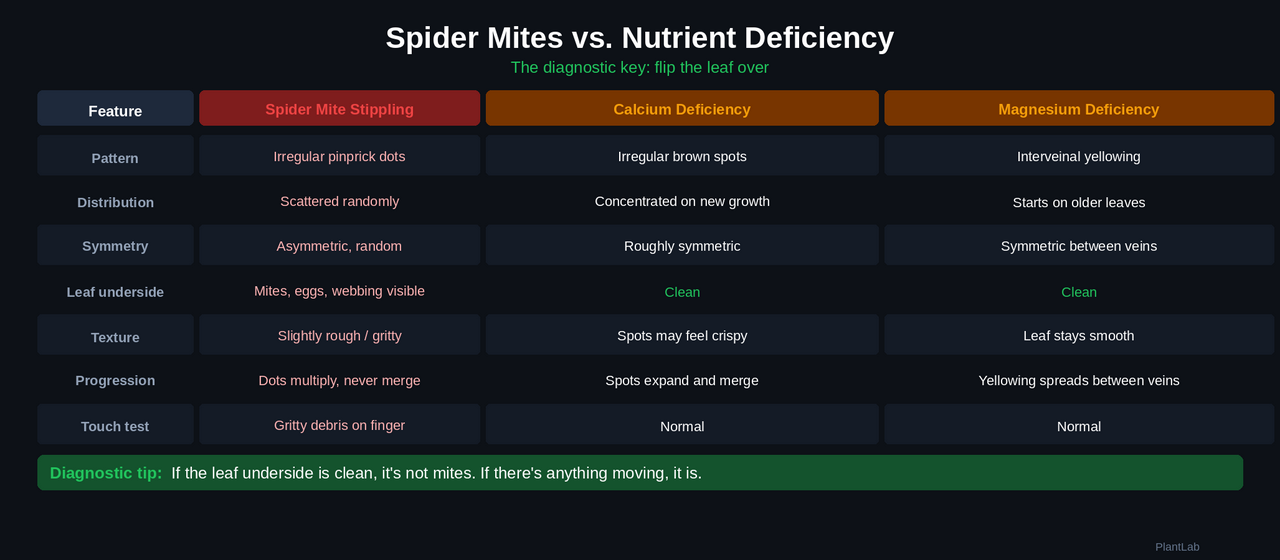
| Feature | Spider Mite Stippling | Calcium Deficiency | Magnesium Deficiency |
|---|---|---|---|
| Pattern | Irregular pinprick dots | Irregular brown spots | Interveinal yellowing |
| Distribution | Scattered randomly across leaf | Concentrated on newer growth | Starts on older leaves |
| Symmetry | Asymmetric, random | Roughly symmetric | Symmetric between veins |
| Leaf underside | Tiny mites or eggs visible | Clean | Clean |
| Texture | Leaf feels slightly rough/gritty | Spots may feel crispy | Leaf stays smooth |
| Progression | Dots multiply, never merge into bands | Spots expand and merge | Yellowing expands between veins |
| Touch test | Gritty feel from mite debris | Normal | Normal |
The diagnostic key: flip the leaf over. Nutrient deficiencies don’t leave anything on the underside. Spider mites leave everything there - adults, eggs, shed skins, webbing. A 10x loupe makes this definitive, but even a phone camera zoomed in on the leaf underside will show the difference.
They breed fast enough to outrun your diagnosis
Spider mites reproduce faster than almost any pest a cannabis grower will encounter.
- Generation time: 7 days at 30°C (86°F). Egg to egg-laying adult in one week.
- Reproductive rate: A single female lays up to 100 eggs. Her daughters start laying within a week.
- Population math: One mite becomes thousands in a month at optimal temperatures. Two months of unchecked growth reaches millions.
This is exponential growth in the literal sense. The population you can’t see on Monday is visible by Friday and webbing by the following Monday. The detection window - the gap between “early enough to treat easily” and “too late for simple solutions” - is approximately 5-7 days.
Every day of misdiagnosis as a nutrient issue is a day lost in that window.
Visual Symptoms by Stage
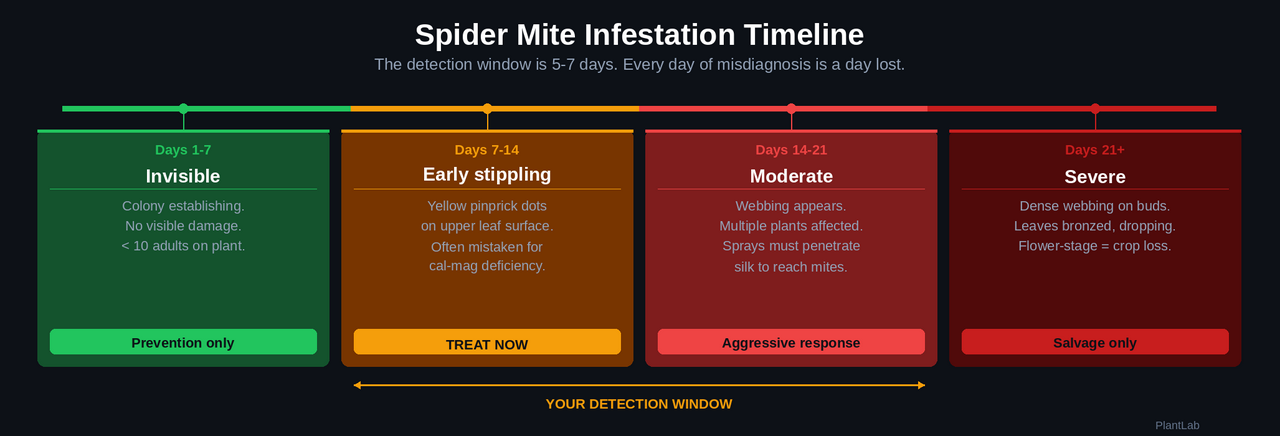
Days 1-7: Invisible Phase
Mites have arrived but the colony is small. Fewer than 10 adults on the plant. No visible damage to the naked eye.
What to look for: Nothing you can see without magnification. Preventive inspection with a 10x loupe on leaf undersides is the only detection method during this phase - or an AI that can catch the earliest stippling pattern in a leaf photo before your eye does.
Days 7-14: Early Stippling
What you see:
- Scattered yellow-white dots on upper leaf surfaces
- Dots are pinprick-sized, irregular spacing
- Lower and inner canopy leaves affected first
- Leaves may appear slightly dull or dusty
This is the critical detection window. The damage is visible but the population is still manageable. Treat now and you win. Wait, and you’re chasing exponential growth.
What growers confuse it with: Calcium deficiency, magnesium deficiency, early light stress, pH fluctuation damage. The distinguishing test: check the leaf underside with a loupe or zoomed phone camera.
Days 14-21: Moderate Infestation
What you see:
- Stippling thickens into visible patches of yellow/bronze discoloration
- Fine webbing appears at leaf tips and where leaves meet stems
- Leaf edges may curl upward
- Multiple plants now show symptoms (airborne spread via “ballooning” on silk threads)
Webbing marks the transition from “problem” to “crisis.” The silk isn’t just housing - it protects colonies from predators and spray treatments. Once webs are established, contact sprays have to penetrate the silk to reach the mites.
Days 21+: Severe Infestation
What you see:
- Dense webbing covering bud sites, connecting leaves
- Leaves are bronzed, curled, and dropping
- Mites visible as tiny moving dots on webbing
- Plant growth has visibly slowed or stopped
- Webbing on flowers makes bud unusable
At this stage, the plant is losing more photosynthetic capacity than it can replace. During flower, this level of infestation is often a total crop loss for affected plants. The mites are feeding on sugar leaves and bract tissue, leaving webbing embedded in the flower structure. Even if you kill every mite, the webbing and fecal matter remain.
Where to Look: Detection Hotspots
Spider mites prefer warm, dry, still air - the conditions that exist in the center and lower canopy of most indoor grows.
Check first:
- Undersides of lower and inner canopy leaves
- Where two leaves overlap (creates still-air microclimate)
- Near intake vents (common entry point)
- Any plant closest to heat sources
Check second:
- Leaf undersides on middle canopy
- Branch junctions where stems create sheltered pockets
- Nearby houseplants, clones, or recently introduced plant material
High-risk conditions:
- Temperature above 27°C (80°F) and rising
- Humidity below 40% RH
- Stagnant air in lower canopy
- New clones or plants introduced without quarantine
- Adjacent rooms or gardens with ornamental plants
One fact most growers don’t realize: spider mites travel on clothing, pets, and skin. If you’ve been in a garden with mites and walk into your grow room, you may be the vector. This is why quarantine protocols matter even for indoor-only grows.
They’re arachnids, not insects
This matters more than you’d think. Spider mites aren’t insects. They’re arachnids - closer to ticks and spiders than to aphids or thrips. A lot of insecticides just don’t work on them, and growers figure this out the expensive way: they buy whatever pest spray the grow shop recommends, apply it twice a week for a month, and the mites keep spreading.
If a product label says “insecticide” but doesn’t specifically list mites or arachnids, it probably won’t work. You need a miticide (specifically targets mites) or a broad-spectrum acaricide (targets arachnids generally). Some biologicals and organic options work by physical mechanisms - suffocation, desiccation - that don’t depend on the pest’s taxonomy. These are often the safest first-line choice.
Treatment Strategies
They evolve faster than you can spray
Spider mites develop pesticide resistance at a rate that makes most agricultural pests look slow. With a 7-day generation cycle, resistance emerges in weeks, not seasons. Some strains of T. urticae are resistant to dozens of active ingredients simultaneously.
Worse: some pesticides cause “mite flaring” - the surviving mites respond to the chemical stress by increasing their reproductive rate by up to 30%. The intuitive response of “spray harder, spray more” can accelerate the infestation rather than control it.
Single-product treatment strategies fail. Always rotate between different modes of action.
During Vegetative Growth
Immediate response (first 48 hours):
- Isolate affected plants if possible
- Remove and dispose of heavily infested leaves (bag them, don’t compost)
- Spray leaf undersides thoroughly with a contact miticide or biological
Biological controls:
- Phytoseiulus persimilis - predatory mite that feeds exclusively on spider mites. Effective in vegetative growth and early flower. Needs humidity above 60% to thrive.
- Neoseiulus californicus - predatory mite that tolerates lower humidity and also eats thrips. Better for dry grow rooms.
- Amblyseius andersoni - generalist predatory mite, survives without prey by eating pollen. Good for preventive releases.
Organic sprays (moderate infestations):
- Neem oil (azadirachtin) - disrupts feeding and reproduction. Apply to leaf undersides only. Do not use in flower - affects taste and may not fully degrade.
- Insecticidal soap (potassium salts of fatty acids) - kills on contact by desiccation. Must directly contact the mite. Repeat every 3-5 days for 3 applications to catch new hatchlings.
- Spinosad - organic-approved, effective on thrips but weak against mites on its own. Can supplement a rotation but shouldn’t be a primary miticide.
Spray rotation protocol:
- Week 1: Product A (e.g., insecticidal soap)
- Week 2: Product B (e.g., neem oil)
- Week 3: Product A again (or a different miticide)
- Never use the same active ingredient twice in a row
During flower
This is where most growers panic, and for good reason. During flower, almost everything that kills mites also ruins buds.
Safe in flower:
- Predatory mites (biological control - no residue, no taste impact)
- Water rinse with slightly elevated pressure (dislodges mites physically, must reach undersides)
- Cold snap trick: drop temperature to 15°C (60°F) for 3 days if possible. Mite reproduction nearly stops below 18°C (65°F). This buys time for predatory mites to work.
Avoid in flower:
- Neem oil (taste contamination, doesn’t fully degrade on flower tissue)
- Pyrethrin sprays (residue on buds)
- Sulfur (burns trichomes, affects terpenes)
- Any systemic product (absorbed into plant tissue including flower)
If webbing is on buds: The honest answer is that those buds are compromised. Webbing contains fecal matter and shed mite skins that don’t wash off. You can salvage the plant by removing affected flowers and protecting remaining buds with predatory mites, but heavily webbed buds should be discarded.
Prevention
A few euros spent preventing mites saves hundreds in lost crop. Prevention beats treatment every time, especially with a pest that breeds this fast.
Environmental controls:
- Keep humidity above 50% RH during veg (mites thrive in dry conditions)
- Ensure airflow reaches the lower canopy (oscillating fans, open plant structure)
- Run temperatures below 27°C (80°F) when possible
- HEPA filter on intake if growing in an area with outdoor mite pressure
Good habits:
- Quarantine new plants for 7-14 days before introducing to your grow
- Change clothes before entering grow room if you’ve been in other gardens
- Inspect leaf undersides weekly with a 10x loupe - make it routine, not reactive
- Remove dead leaves and debris from the grow space (harboring sites)
- Avoid overly dense canopy - defoliate lower growth that gets no light and creates still-air pockets
Preemptive predators:
- Release Amblyseius andersoni or N. californicus at transplant. These predatory mites establish a background population that intercepts spider mites before colonies form. Cost: roughly €20-30 per release for a small grow, every 4-6 weeks.
How AI detection changes the timeline
The spider mite problem is a timing issue. The window between “just arrived” and “exponential growth” is about 5-7 days. Most growers catch mites after stippling is already obvious - right at the edge of that window, or past it.
The main reason growers miss that window isn’t inattention. Early stippling - those first scattered yellow dots where mites have punctured cells - looks almost identical to the start of a calcium or magnesium deficiency. Same distribution, same size, same location on older growth. A grower sees the dots, checks pH, adjusts the feed, and waits a week for results. By the time the nutrient hypothesis is ruled out and a loupe comes out, mites have had 7-10 days of uncontested growth. At one generation per week, that adds up.
PlantLab’s model covers 30 cannabis conditions including spider mite damage. It catches the stippling pattern at the 10-dot stage, from a routine photo. Not a replacement for the loupe - nothing is - but it flags the pattern before you’ve mentally filed it as “probably cal-mag” and moved on.
Catching mites at day 7 instead of day 14 is the difference between wiping down some leaves and losing a crop.
Free at plantlab.ai - 3 checks a day.
FAQ
How do I tell spider mite damage from a nutrient deficiency? Flip the leaf. Spider mite damage shows as scattered pinprick dots on top with mites, eggs, or webbing underneath. Nutrient deficiencies cause broader color changes with clean leaf undersides. A 10x loupe on the underside is the definitive test.
Can I see spider mites without a magnifying glass? Adults are barely visible to the naked eye (0.3-0.5mm) as tiny moving specks on leaf undersides. Eggs and juveniles are too small to see without magnification. By the time mites are easily visible, the colony is large. Use a loupe or phone camera zoom for early detection.
How fast do spider mites spread between plants? In optimal conditions (above 27°C / 80°F, below 40% RH), mites can move from one plant to adjacent plants within 24-48 hours. They also “balloon” on silk threads carried by air currents, reaching plants across a room. A single infested plant can become a room-wide problem in 5-10 days.
Will neem oil get rid of spider mites? Neem works as part of a rotation, not as a standalone. It disrupts feeding and reproduction but doesn’t kill on contact, and mites build resistance to it quickly. Rotate with insecticidal soap and other modes of action. And never use it during flower - it doesn’t come off.
What kills spider mites instantly? Insecticidal soap and pyrethrin kill on contact, but only what they touch. You’ll miss eggs. Plan for 3 rounds over 2 weeks to catch hatching cycles.
Related reading
- Thrips on Cannabis: The Silver Streaks Growers Blame on Light - the other surface-scarring pest, and how to tell silver streaks from mite stippling
- Powdery Mildew on Cannabis: Visual Detection and Prevention - the disease that spreads in the same still-air, low-humidity pockets mites love
- What’s Wrong With My Cannabis Plant? A Visual Diagnosis Guide - the full symptom-to-cause quick reference