Build an Autonomous Plant Health Monitor with Home Assistant
What You'll Build
A camera watches your plants on a schedule. Each photo goes to an AI trained only on cannabis, and Home Assistant turns the answer into sensors you can automate against. Something looks off, your phone buzzes with the diagnosis and the photo. Everything's fine, it stays quiet.
Setup runs about 20 minutes. The cost is a camera you probably already own plus PlantLab's free tier – three diagnoses a day, no card. No soldering, no standalone Python scripts. A Home Assistant integration and some YAML.
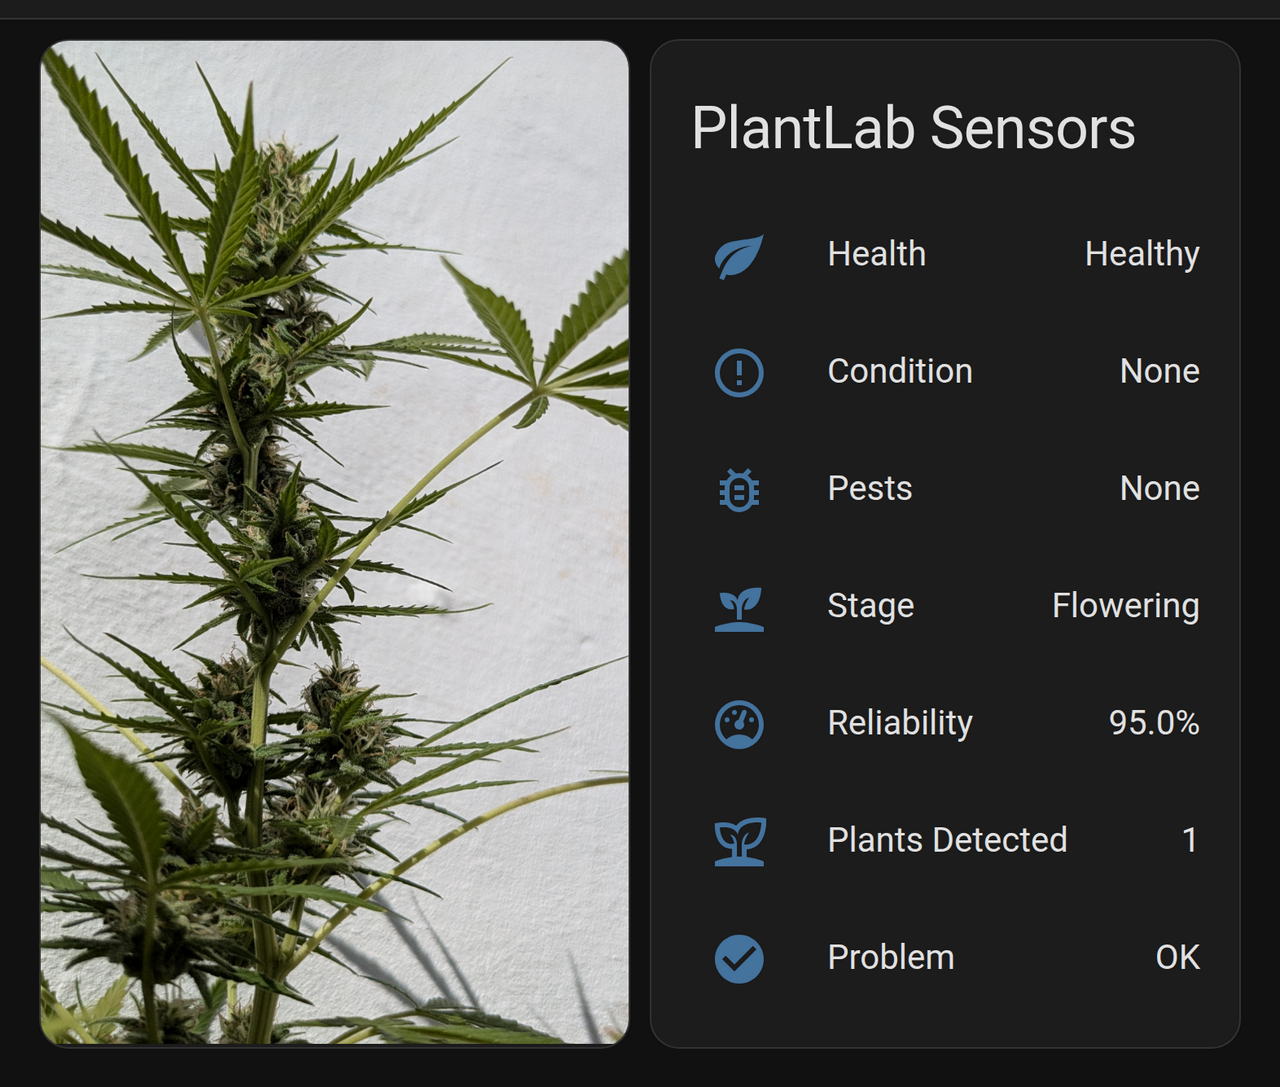
Your eyes are good. They're also asleep at 6 AM, and they've never once compared today's leaf color against yesterday's with any real consistency. A camera bolted to a tent pole doesn't get distracted and has never talked itself into “it's probably fine” at 11 PM. That's the whole pitch.
If you run Node-RED instead of native HA automations, there's a companion walkthrough for that. This one stays inside Home Assistant.
Prerequisites
- Home Assistant running – any install method
- A camera HA can snapshot: IP cam, Frigate, ESP32-CAM, Wyze with RTSP, Reolink, Tapo, anything with a
camera.entity - A PlantLab account – free at plantlab.ai; grab your API key from the dashboard
- HACS – optional, but it makes the install one click
- Basic YAML comfort. If you've edited
configuration.yaml, you're set.
Camera positioning: shoot the canopy from above or a slight angle. Overhead gives the best coverage. Avoid shooting through blurple LEDs – the model needs real leaf color, not everything tinted purple. If your lights are blurple, run the check during a lights-off window or use the camera's white LED.
Step 1: Install the PlantLab Integration
Via HACS (recommended)
- Open HACS in the sidebar
- Search PlantLab in Integrations
- Click Download
- Restart Home Assistant
Manual install
# SSH into your HA machine
cd /config/custom_components/
git clone https://github.com/plantlab-ai/home-assistant-plantlab.git plantlab_temp
mv plantlab_temp/custom_components/plantlab .
rm -rf plantlab_temp
Restart HA after copying.
Configure
- Settings > Devices & Services
- + Add Integration
- Search PlantLab
- Paste your API key
- Done – you get a PlantLab device with a set of sensors.
No YAML for the integration itself. The config flow handles it.
Step 2: Meet Your New Sensors
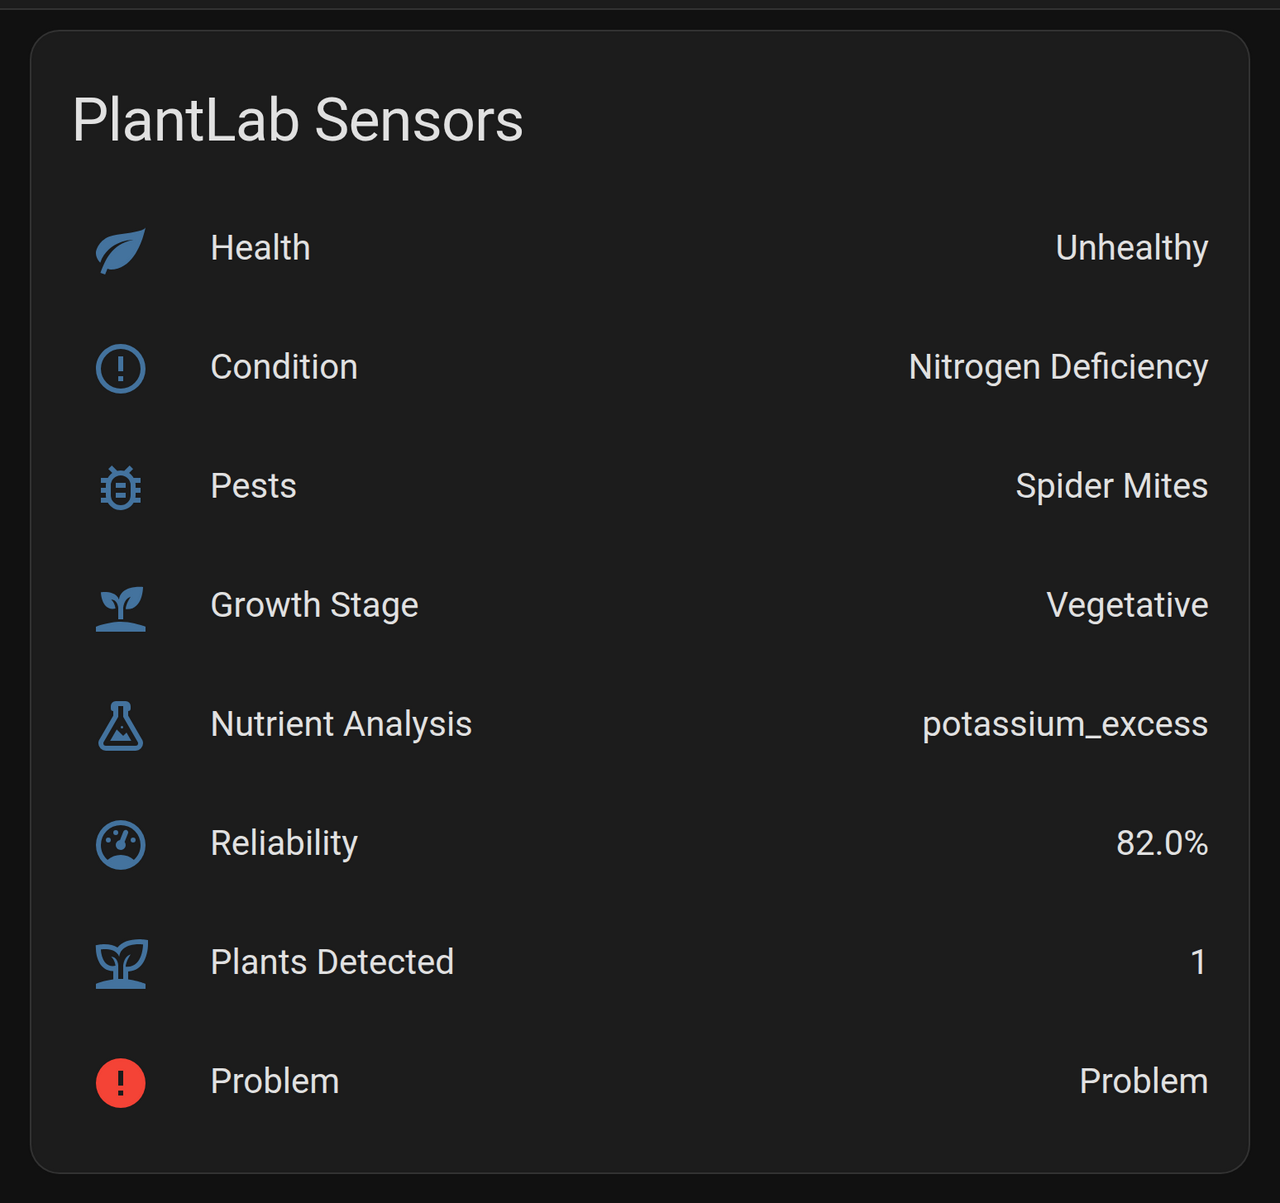
After setup you get these entities automatically:
| Entity | What it shows | Example state |
|---|---|---|
sensor.plantlab_health |
Overall verdict | unhealthy |
sensor.plantlab_conditions |
Top condition | Nitrogen Deficiency |
sensor.plantlab_pests |
Top pest | Spider Mites |
sensor.plantlab_growth_stage |
Current stage | vegetative |
sensor.plantlab_nutrient_analysis |
Mulder's Chart hypothesis | potassium_excess |
sensor.plantlab_reliability_score |
How much to trust this call (0-100%) | 82.0 |
sensor.plantlab_plant_count |
Plants detected in the frame | 1 |
binary_sensor.plantlab_problem |
Simple on/off | on when something's wrong |
One thing worth flagging up front: the condition and pest sensors report the display name – Nitrogen Deficiency, not nitrogen_deficiency. That matters when you trigger automations on their state. The raw snake_case class_id lives in the sensor's attributes and in the service response, which is what you'll actually key automations off of below.
Everything reads “Unknown” until the first diagnosis runs. After a check:
Step 3: The Daily Health Check
Runs once a day, grabs a photo, sends it to PlantLab, and pings you only if there's a problem. Quiet when fine, loud when not.
automation:
  - alias: "Plant Health Check - Morning"
    trigger:
      - platform: time
        at: "08:00:00"
    action:
      # Capture a snapshot
      - action: camera.snapshot
        target:
          entity_id: camera.grow_tent    # your camera entity
        data:
          filename: /config/www/plant_check.jpg

      # Give the file a moment to write
      - delay:
          seconds: 3

      # Run the diagnosis
      - action: plantlab.diagnose
        data:
          image_path: /config/www/plant_check.jpg
        response_variable: result

      # Alert only if the first plant comes back unhealthy
      - if: >
          {{ result.results | count > 0
             and result.results[0].is_healthy == false }}
        then:
          - action: notify.mobile_app_your_phone
            data:
              title: "Plant Issue Detected"
              message: >
                {{ result.results[0].conditions[0].display_name }}
                detected ({{ (result.results[0].conditions[0].confidence * 100) | round }}% confidence).
                Growth stage: {{ result.results[0].growth_stage }}.
              data:
                image: /local/plant_check.jpg
One structural thing to know: PlantLab returns one result per detected plant under results. result.results[0] is the first plant, which is why the health check, the condition, and the confidence all read off results[0] and not the top level. More on multi-plant in a moment.
Why morning? You catch overnight problems before the lights-on period drives symptoms further, and the first hour of the light cycle gives a neutral photo without heat-droop.
Skip the file – snapshot from the camera directly
Don't want files on disk? Point the service at the camera entity:
      - action: plantlab.diagnose
        data:
          entity_id: camera.grow_tent
        response_variable: result
Simpler, but you lose the photo to attach to the notification. Your call.
Step 4: Add It to Your Dashboard
A basic card for last-check results:
type: vertical-stack
cards:
  - type: picture-entity
    entity: camera.grow_tent
    name: Grow Tent
    show_state: false

  - type: entities
    title: Plant Health
    entities:
      - entity: sensor.plantlab_health
        name: Status
      - entity: sensor.plantlab_conditions
        name: Condition
      - entity: sensor.plantlab_pests
        name: Pests
      - entity: sensor.plantlab_growth_stage
        name: Growth Stage
      - entity: sensor.plantlab_reliability_score
        name: Reliability
      - entity: binary_sensor.plantlab_problem
        name: Problem?
Nothing fancy, but it's one screen. Make it prettier if you like – I'm an engineer, not a designer.
Step 5: The Fun Part
Gate on confidence and reliability
Every diagnosis carries a per-condition confidence and a plant-level reliability_score – a 0-1 trust signal for the whole call. You don't want a push for every marginal detection. Extend the if from Step 3:
      - if: >
          {{ result.results | count > 0
             and result.results[0].is_healthy == false
             and result.results[0].conditions[0].confidence > 0.75
             and result.results[0].reliability_score > 0.7 }}
        then:
          - action: notify.mobile_app_your_phone
            data:
              title: "Confirmed Issue"
              message: >
                {{ result.results[0].conditions[0].display_name }}
                at {{ (result.results[0].conditions[0].confidence * 100) | round }}% confidence.
Auto-respond to a specific condition
With smart plugs, dosing pumps, or controllable fans you can close the loop. Read the class_id straight off the response – it's the stable snake_case identifier, unlike the display-name sensor state:
      # inside the same daily-check automation, after the diagnose call
      - if: >
          {{ result.results | count > 0
             and result.results[0].conditions[0].class_id == 'calcium_deficiency'
             and result.results[0].conditions[0].confidence > 0.8 }}
        then:
          # Dose cal-mag for 5 seconds
          - action: switch.turn_on
            target:
              entity_id: switch.calmag_pump
          - delay:
              seconds: 5
          - action: switch.turn_off
            target:
              entity_id: switch.calmag_pump

          # Always notify when auto-dosing
          - action: notify.mobile_app_your_phone
            data:
              title: "Auto-Dosed Cal-Mag"
              message: >
                Calcium deficiency at
                {{ (result.results[0].conditions[0].confidence * 100) | round }}%.
                Dosed 5 seconds of cal-mag. Check your plant.
Fair warning: always notify when auto-dosing, and set a real confidence floor. Let the system correctly ID a condition manually a few times before you trust it to dose. A pump firing on a false positive is not a fun morning.
Handle more than one plant
If your camera sees the whole tent, results has an entry per plant and sensor.plantlab_plant_count tells you how many. Loop instead of assuming results[0]:
      - repeat:
          for_each: "{{ result.results }}"
          sequence:
            - if: "{{ repeat.item.is_healthy == false }}"
              then:
                - action: notify.mobile_app_your_phone
                  data:
                    title: "Plant Issue Detected"
                    message: >
                      {{ repeat.item.conditions[0].display_name }}
                      ({{ (repeat.item.conditions[0].confidence * 100) | round }}%).
The per-plant sensors always track the first plant, so the loop is how you cover a multi-plant frame. If you'd rather diagnose each plant cleanly, give each its own camera and its own automation.
Ramp up monitoring when something's wrong
automation:
  - alias: "Increase Checks When Unhealthy"
    trigger:
      - platform: state
        entity_id: binary_sensor.plantlab_problem
        to: "on"
    action:
      - action: automation.turn_on
        target:
          entity_id: automation.plant_health_check_afternoon
Create a second check (afternoon, maybe a different angle) that's normally disabled and only wakes up when a problem is flagged. More eyes when it matters, silence otherwise.
Troubleshooting
| Problem | Likely cause | Fix |
|---|---|---|
is_cannabis: false, plant count 0 |
Camera angle, blurple lights, or a lens cap | Adjust position, use white light or flash, check the camera feed |
| No notification | Template not matching the new results[] shape |
Test in Developer Tools > Template with a real result first |
| 401 Unauthorized | Invalid API key | Re-enter in Settings > Devices & Services > PlantLab > Configure |
| Sensors stuck “Unknown” | No diagnosis run yet | Call plantlab.diagnose manually in Developer Tools > Actions |
| Rate limit (429) | More than 3 checks/day on free tier | Space out automations or upgrade to Pro |
What the API Actually Returns
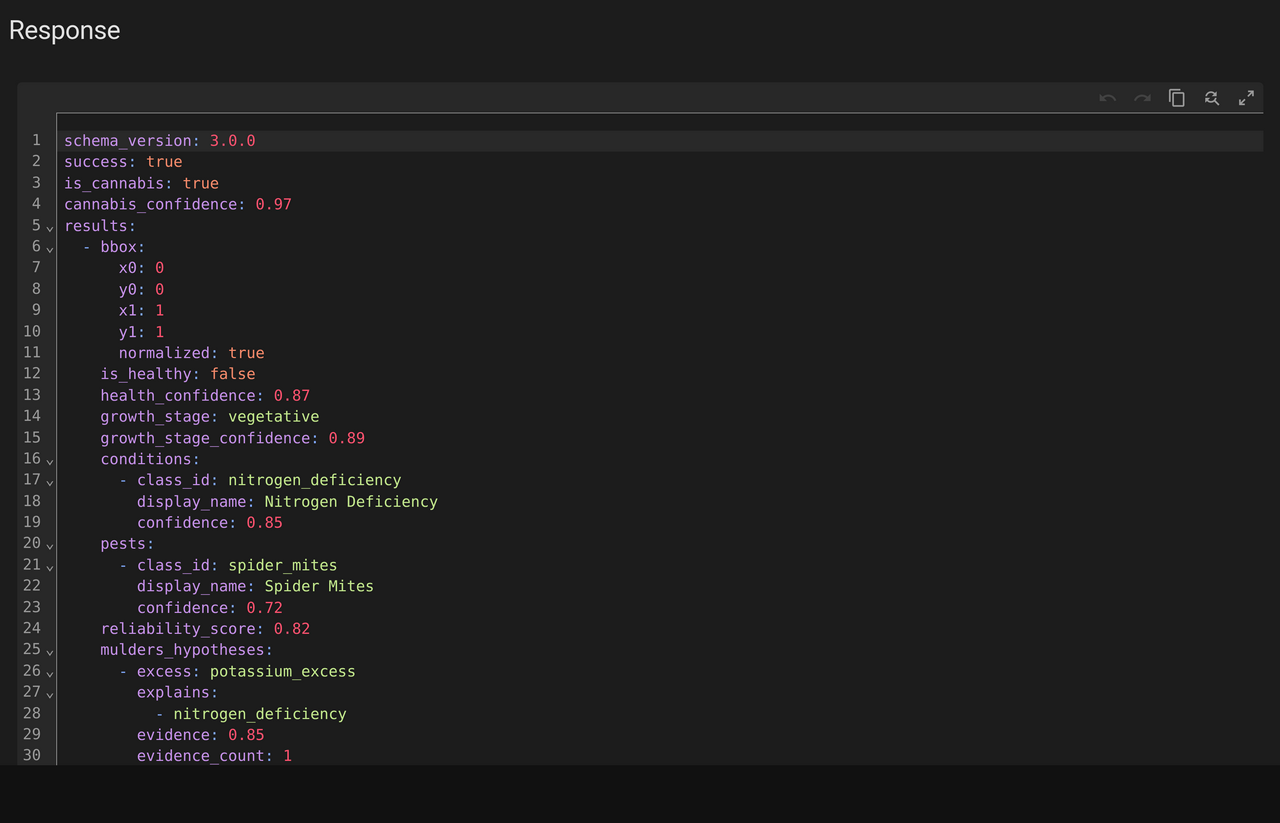
Here's the full response – everything inside result in your automations. Note the top-level is_cannabis (image-wide) versus the per-plant fields nested in results:
schema_version: "3.0.0"
success: true
is_cannabis: true
cannabis_confidence: 0.97
results:
  - bbox: { x0: 0, y0: 0, x1: 1, y1: 1, normalized: true }
    is_healthy: false
    health_confidence: 0.87
    growth_stage: vegetative
    growth_stage_confidence: 0.89
    conditions:
      - class_id: nitrogen_deficiency
        display_name: Nitrogen Deficiency
        confidence: 0.85
    pests:
      - class_id: spider_mites
        display_name: Spider Mites
        confidence: 0.72
    reliability_score: 0.82
    mulders_hypotheses:
      - excess: potassium_excess
        explains:
          - nitrogen_deficiency
        evidence: 0.85
        evidence_count: 1
reliability_score is a 0-1 trust signal for that plant's diagnosis – higher means PlantLab is more confident the call is right. Route on it for automations that should only fire on high-trust results.
mulders_hypotheses is the nutrient antagonism read. Here it's flagging that the nitrogen-deficiency symptoms might trace back to a potassium excess locking out nitrogen uptake, rather than an actual shortage – so piling on more nitrogen could make it worse. That's the kind of thing that saves a week of chasing the wrong fix.
Each plant in a multi-plant frame gets its own entry with its own bbox (normalized [0,1] canopy box), so you always know which plant a diagnosis belongs to.
FAQ
How many checks per day on the free tier?
Three. One morning, one evening, one spare for when you're feeling paranoid – enough for a home grow. Pro is 500/month if you need more.
Can I use any camera?
If HA can snapshot from it, PlantLab can diagnose from it. Tested with Frigate, Wyze RTSP, ESP32-CAM, Reolink, and Tapo. Phone photos work too – drop the image in /config/www/ and point the service at the path.
Does this work for tomatoes?
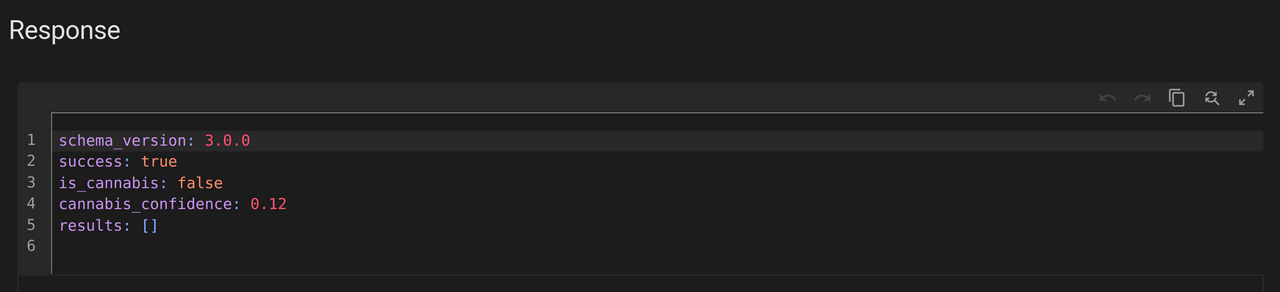
No. PlantLab will look at your tomato and politely tell you it's not cannabis.
It says healthy but I can see a problem. Now what?
Trust your eyes. The AI catches things you haven't noticed yet – it's not there to override what you already see. Early symptoms, odd lighting, and blurry photos all cut accuracy. Cannabis detection and the overall health check are the most reliable parts; specific condition labels, especially lookalike nutrient deficiencies, are harder and keep improving with each retrain.
Can I run this offline?
Not yet – cloud only. On-premise is on the roadmap for air-gapped facilities.
PlantLab diagnoses 31 cannabis conditions – nutrient deficiencies, pests, diseases, and environmental stress – from a single photo. The Home Assistant integration is open source at github.com/plantlab-ai/home-assistant-plantlab. Try it free at plantlab.ai.